Lab Scenario
When installing your Linux server, you used the DNS IP addresses from your Internet Service Provider. This was so your Linux server could have Internet access for registration and network time protocol. However, at Big Sky Fishing Supply, your goal is to replace your existing Windows DNS server with the new Linux DNS Server. This Linux DNS Server will provide local DNS name resolution. When this local DNS server cannot resolve the name requested (such as an Internet DNS name), it will forward that request to the Internet DNS servers, located at your ISP.
To accomplish this, we will:
1. Install the DNS management tool on the Linux server.
2. Configure DNS to provide local name resolution.
3. Test name resolution from your Client1 (Windows XP Client) to the Linux DNS Server.
Please note that DNS Server in Linux is called BIND. BIND stands for Berkley Internet Name Domain.
1. To install the DNS GUI management tool, go to Applications - Add/Remove Software.

2. The Package Manager window will appear. Click on the Servers section on the left hand side.

3. Click on the Server Configuration Tools section and then click Optional Packages.

4. Check the checkbox next to system-config-bind. This is the DNS graphical configuration tool. Once this is checked, click Close, then click Apply back on the Package Manager window. You will see this window:

5. Click Continue. The package will be downloaded from the Internet.
6. When you are asked if you want to import the key, click Import Key. The DNS
management utility files will be copied and your update is complete.

Click OK. The Package Manager application will then automatically close. The installation of the DNS GUI tool is complete

Configuring Linux DNS Server
Your goal is to be able to use the Server1 Linux server as a DNS server for your Windows clients. The Linux server will provide name resolution for the local LAN and will forward any requests that it is unable to resolve to your ISP’s DNS servers. The requests that it is unable to resolve will be, most likely, Internet DNS names.
1.To do this, start the DNS GUI management tool by going to System - Administration - Server Settings - Domain Name System.

2.Once started, you should see a utility called the Bind Configuration GUI.

3. Let me stress that our goal is to have the Windows PC go to the Linux server for DNS lookup (both for the internal LAN and external Internet networks). To do this, we will take these steps:
• Configure the Linux server to forward all unknown requests to external Internet ISP DNS servers (create a forwarder).
• Create a new Zone. Add a hostname alias on the Linux DNS server for the Windows PC and for the Linux Server.
• Configure the Linux server to go to itself for DNS.
• Configure the Windows system to go to the Linux server for all DNS requests.
To configure the first task of creating a forwarder, you will need your current Internet Service provider’s IP addresses. Note those down here, or on your own notepad:
ISP Primary DNS ___ . ___ . ___ . ___
ISP Secondary DNS ___ . ___ . ___ . ___
Remember, you configured these IP addresses when you loaded Linux. If you have trouble finding them, they can be found by going to System - Administration - Network, then click on the DNS tab, like this:

4. Once you have this information, in your DNS configuration tool, click on the first line that says DNS Server. Then click Properties, on the toolbar, like this:

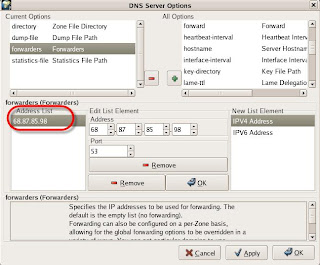
5. On the Properties window, on the right side, under All Options, scroll down the list until you find Forwarders (with an S at the end). Click on Forwarders, then click the + (plus) sign to add it to the list of Current Options, like this:

6. Now click on the IPV4 Address on the middle right of this window. In the Edit List Element that comes up, enter the IP address of your ISP’s primary DNS server in the address boxes. It is easiest to just type them in. Make sure that your NumLock is on, if you are using the numbered keypad.

7. Once you entered that address, click OK. Once added, it should be on the middle left box called Address List, like this:

8. Now repeat this procedure for the secondary DNS server. To repeat it, click on IPV4 Address, enter the address, and then click OK. When done, you should have two addresses in the Forwarders Address List, like this:

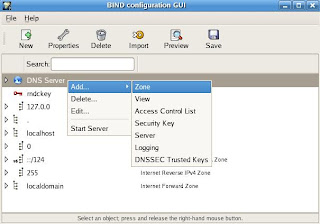
9. Before we begin our second task of creating an alias for our Client1 Windows XP system, we first need to create a new DNS Zone for BigSkyFishingSupply.com. To do this click on the New button and click Zone.

10. The box below will come up. This box is confusing. What you want to do is first click OK under Class, then OK under Origin Type, then OK at the bottom of the window.

11. That will bring you to the box below. On this window, fill in the Forward Zone Origin box with BigSkyFishingSupply.com. Don’t forget the “.” (dot) at the end of the domain name. Click OK.
 12. Next, you’ll see this tall window that is used to configure the Zone. Make sure that the Authoritative Name Server is Server1.BigSkyFishingSupply.com. Nothing else needs to be changed.
13. Now, we can move on to adding the aliases for the Windows Client and for the DNS Server itself. To do this, right click on the BigSkyFishingSupply domain line and clickAdd. A menu will appear. Click on the first line that says A IPv4 Address.

14. In the A IPv4 Alias window that appears, enter the client’s name as
client1.BigSkyFishingSupply.com. and the IP address for Client1 as 192.168.1.10.

Click OK. Now, repeat this procedure for Server1 by adding an A IPv4 Alias record for Server1 at IP address 192.168.1.100.
15. Let’s now go ahead and save the DNS server configuration changes by clicking the big Save button on the toolbar, like this:

When you are asked if you want to backup and replace the DNS configuration files, click Yes.
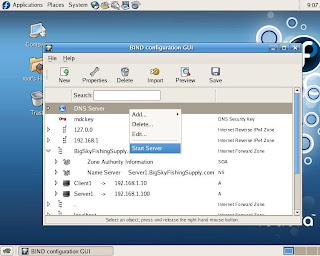
16. Let’s go ahead and start our DNS server. It is not started by default. To do this, rightclick on the DNS Server line, then click Start Server, like this:

17. For our third task of configuring the Linux server to use itself for DNS, go to System - Administration - Network, then click on the DNS Tab. Now close the DNS GUI management utility by clicking the X on the top right hand side of the window. Change your current Primary DNS server to the IP address of your Linux server, 192.168.1.100. Remove the Secondary DNS Server. When done, it should look like this:

18. Go to File and click Save. You will be given a warning that “changes are saved and you
may need to restart network services”. Click OK. Close out the network configuration by going to File and clicking Quit. For this to be the production DNS server, there is an important configuration change we need to make. We need the DNS Server (also known as bind and named) to start automatically, when the server starts. To do this, go to System - Administration - Server Settings - Services. This will bring up the services window. Scroll down to the named section (they are in alphabetical order) and check the checkbox next to it.

Once named has a checkmark, click Save on the Toolbar. Then, close the Services Configuration by clicking X on the top right hand side of the window. Let’s go ahead and restart the Linux machine to ensure all network changes took effect. To do this, go to System - Shutdown. When the window appear, select Restart computer. Once the Linux server restarts, log back into the console as root. We have completed the configuration of the Linux DNS Server.
To test our Windows client with name resolution for local and Internet DNS names, we next need to change our DNS server setting on the Windows client.
19. To do this, on the Windows client, go to Start - Settings - Network Connections and click on your local network connection. This could be a wireless adaptor or a wired Ethernet adaptor. Once the status window for your connection appears, click on Properties.

20. Once the properties appear, scroll down the list of items used and double click on TCP/IP.

21. At this point, it is important that you use the static IP address, subnet mask and default gateway provided. Most importantly, you need to change the DNS server information to look like it does in the picture. In other words, you only have a primary DNS server and that is your Linux server at IP address 192.168.1.100.

22. Now click on the Advanced button, then on the DNS tab.

23. In the DNS suffix for this connection blank, type in BigSkyFishingSupply.com and click OK. Click OK on the TCP/IP Properties box, then OK on the network connection properties so the changes will take effect. At this point, you should be able to open a web browser and go to your normal Internet web sites because you are using Internet DNS forwarding through the Linux server. Test this out. Also, open a Windows Command Prompt by doing Start - Run and typing cmd. Once in the command prompt type Ping server1 and Ping client1.bigskyfishingsupply.com (you must use a fully-qualified domain name or else the client will just resolve DNS to its local host adaptor, not really testing the new DNS server). If your new Linux DNS server is configured properly and working, you should have all ping requests responded to, like this:

CopyLeft © 2009 http://fedora-x.blogspot.com/
Download PDF Format : installing & configuring DNS Server on Fedora Lab.2
Related Post : installing fedora linux lab1


No comments:
Post a Comment