Thursday, January 15, 2009

Installing & Configuring Fedora Linux DHCP Server Lab.3

1. To install and configure Fedora Linux DHCP server, First of all install DHCP package : open up your Add or Remove Packages application bygoing to Applications - Add/Remove Software. On the left, click on Servers and, on the right, click on Network Servers.


Notice that next to the Optional Packages button, it tells you that 3 of the possible 21 packages under Network Servers have already been installed. We are going to install another one. Click on Optional Packages for that package.

2. When the list of extra packages to be installed appears, check the checkbox next to DHCP. Do not install the DHCPv6 server.

Click Close.

3. Back on the Add or Remove Packages window, click Apply.


4. You will be asked to review the packages that will be installed. Sometimes there are more packages being installed that you may think you selected because one package to you may include more than one package to Linux.


5. The package will be downloaded and installed from the Internet and you should get this message:


Click OK and the Package Manager application will close automatically. The DHCP Server (called dhcpd, or DHCP Daemon) is now successfully installed.

Configuring Linux DHCP server
Configuring dhcpd can be a little tricky since there is no graphical administrative console included. For later reference, there are some free administrative consoles that work with dhcpd available, such as www.webmin.com. However, in this lab, we will manually edit and create a dhcpd configuration file. Don’t worry, this isn’t as difficult as it may sound because you will be provided with exactly what you need to type into the file.

1. To get started, open a Linux terminal window (command prompt) by going to Applications - Accessories - Terminal.


2. You should see the following window appear. In this window, type dhcpd and press
Enter.


3. This will attempt to start the DHCP server but the attempt will fail because there is no configuration file. DHCPd requires a text configuration file in the directory /etc called dhcpd.conf. Let’s create that file. To do this, start your text editor by going to Applications - Accessories - Text Editor.


4. This text editor is called gedit. In the text editor window, type in the following:

ddns-update-style interim;
subnet 192.168.1.0 netmask 255.255.255.0 {
range 192.168.1.200 192.168.1.240;
option subnet-mask 255.255.255.0;
option broadcast-address 192.168.1.255;
option routers 192.168.1.1;
option domain-name-servers 192.168.1.100;
option domain-name "bigskyfishingsupply.com";
}

Be careful that the syntax is correct! Watch out for the squiggly-brackets “{}” before the range and after the options. The first line about DDNS is required. The remaining part of the configuration creates the DHCP scope and specifies the options that will be handed out to the clients when they request a DHCP address. For more information on how to configure the DHCPD server and this configuration file, see this website:

http://www.siliconvalleyccie.com/linux-hn/dchp.htm and their official website is at:
http://www.isc.org/index.pl?/sw/dhcp/

Now click on the big Save button on the toolbar. It will ask for a name. Type in dhcpd.conf. Click Browse for other Folders. By clicking on FileSystem then on /etc, your window should look like this. Next, click Save.


5. When you are asked if you want to replace the existing file, click Replace.


6. When done, your gedit text editor window should look like this:


Notice the filename and folder across the title bar of the window. Click on the X on the top right of the window to close out the text editor.

7. Now you will be back at your terminal window (command prompt). On this window, press the up arrow key to show your last command. That command should be dhcpd. If it is, press Enter. If not, delete it and type dhcpd, then press Enter. You should see something like this:


The DHCP server is now configured and running. It is time to test the server out with our Windows client, Client1.

Please note that the DHCPD server can be started by going to the services manager, found at System - Administration - Server Settings - Services. This is also where you would configure the server to start automatically when the Linux sever boots. Currently, we did not configure the DHCP server to start when the Linux server boots. Thus, if you reboot this Linux server, when it comes back up, clients won’t receive IP addresses anymore.

Test Linux DHCP server with Windows Client
1. To test our new Linux DHCP server, go to your Windows client, Client1. To do this, on the Windows client, go to Start - Settings - Network Connections and click on your local network connection. This could be a wireless adaptor or a wired Ethernetadaptor. Once the status window for your connection appears, click on Properties.


2. Once the properties appear, scroll down the list of items used and double click on
TCP/IP.


3. Once on the TCP/IP Properties section, select both the radio buttons that say Obtain IP Address Automatically and Obtain DNS Server Address Automatically. When done, it should look like this:


Click OK on the TCP/IP Properties box, then OK on the network connection
properties so the changes will take effect.

4. When you click that last OK button, your Windows client will immediately change from your static IP address to a dynamic address. It will immediately try to obtain that dynamic IP address (and associated information) using DHCP. The first DHCP server that responds with an address will be used. In our case, it should be Server1, the new Linux DHCP server. To see if you successfully obtained an address from that server, open a Windows command prompt by going to Start - Run. Type in cmd for the program to run and click OK. Once inside the Windows command prompt, type in IPCONFIG /ALL and press Enter.

What you are looking for is that the adaptor you configured to use DHCP:
• has an address
• obtained that address from Server1.
What you should find looks something like this:


Notice in this window that this adaptor has an IP address and, more importantly, it obtained it from DHCP Server 192.168.1.100. That IP address is the address of Server1. Because of this, we know that our test was a success.

5. You can also open up the status screen on your network adaptor by clicking on the Support tab, then on the Details button. You should see something like this:


The testing of the Linux DHCP server from the Windows client is complete and so is Lab 3.

NOTE :
Lab Scenario
A core Windows infrastructure feature that the new Big Sky Fishing Supply Linux server is replacing is DHCP. As you know, DHCP provides a dynamically assigned IP address, subnet mask, default gateway and DNS information for devices on a LAN. In this lab, we will configure the new Linux server, Server1, as a DHCP server for the Windows client, Client1. Keep in mind that you cannot easily configure a DHCP server to hand out an IP address for just one client so this Linux server will hand out IP addresses for any client that connects. Because of this, you don’t want to do this exercise on a production network. If you have another DHCP server already on the non-production network upon which you are performing this lab (such as one on a home network router), then you will need to disable those DHCP server before starting this lab.

Download PDF Format : Installing & Configuring Fedora Linux DHCP Server Lab.3
Related Article : installing & configuring DNS Server on Fedora


Wednesday, January 14, 2009

Installing & Configuring DNS Server on Fedora - Lab.2

Using Linux as a DNS Server, Step To install and configure DNS Server on Fedora Linux. We installed the DNS server when we installed Linux. However, we did not install the DNS graphical management tool. Of course, DNS can be administered and fully configured from the command line. However, configuring Linux DNS from the command line is challenging, even for an experienced Linux user.

Lab Scenario
When installing your Linux server, you used the DNS IP addresses from your Internet Service Provider. This was so your Linux server could have Internet access for registration and network time protocol. However, at Big Sky Fishing Supply, your goal is to replace your existing Windows DNS server with the new Linux DNS Server. This Linux DNS Server will provide local DNS name resolution. When this local DNS server cannot resolve the name requested (such as an Internet DNS name), it will forward that request to the Internet DNS servers, located at your ISP.

To accomplish this, we will:
1. Install the DNS management tool on the Linux server.
2. Configure DNS to provide local name resolution.
3. Test name resolution from your Client1 (Windows XP Client) to the Linux DNS Server.
Please note that DNS Server in Linux is called BIND. BIND stands for Berkley Internet Name Domain.

1. To install the DNS GUI management tool, go to Applications - Add/Remove Software.


2. The Package Manager window will appear. Click on the Servers section on the left hand side.


3. Click on the Server Configuration Tools section and then click Optional Packages.


4. Check the checkbox next to system-config-bind. This is the DNS graphical configuration tool. Once this is checked, click Close, then click Apply back on the Package Manager window. You will see this window:


5. Click Continue. The package will be downloaded from the Internet.
6. When you are asked if you want to import the key, click Import Key. The DNS
management utility files will be copied and your update is complete.


Click OK. The Package Manager application will then automatically close. The installation of the DNS GUI tool is complete


Configuring Linux DNS Server
Your goal is to be able to use the Server1 Linux server as a DNS server for your Windows clients. The Linux server will provide name resolution for the local LAN and will forward any requests that it is unable to resolve to your ISP’s DNS servers. The requests that it is unable to resolve will be, most likely, Internet DNS names.

1.To do this, start the DNS GUI management tool by going to System - Administration - Server Settings - Domain Name System.


2.Once started, you should see a utility called the Bind Configuration GUI.


3. Let me stress that our goal is to have the Windows PC go to the Linux server for DNS lookup (both for the internal LAN and external Internet networks). To do this, we will take these steps:

• Configure the Linux server to forward all unknown requests to external Internet ISP DNS servers (create a forwarder).
• Create a new Zone. Add a hostname alias on the Linux DNS server for the Windows PC and for the Linux Server.
• Configure the Linux server to go to itself for DNS.
• Configure the Windows system to go to the Linux server for all DNS requests.
To configure the first task of creating a forwarder, you will need your current Internet Service provider’s IP addresses. Note those down here, or on your own notepad:
ISP Primary DNS ___ . ___ . ___ . ___
ISP Secondary DNS ___ . ___ . ___ . ___

Remember, you configured these IP addresses when you loaded Linux. If you have trouble finding them, they can be found by going to System - Administration - Network, then click on the DNS tab, like this:


4. Once you have this information, in your DNS configuration tool, click on the first line that says DNS Server. Then click Properties, on the toolbar, like this:


5. On the Properties window, on the right side, under All Options, scroll down the list until you find Forwarders (with an S at the end). Click on Forwarders, then click the + (plus) sign to add it to the list of Current Options, like this:


6. Now click on the IPV4 Address on the middle right of this window. In the Edit List Element that comes up, enter the IP address of your ISP’s primary DNS server in the address boxes. It is easiest to just type them in. Make sure that your NumLock is on, if you are using the numbered keypad.


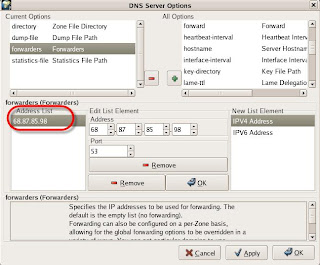
7. Once you entered that address, click OK. Once added, it should be on the middle left box called Address List, like this:


8. Now repeat this procedure for the secondary DNS server. To repeat it, click on IPV4 Address, enter the address, and then click OK. When done, you should have two addresses in the Forwarders Address List, like this:


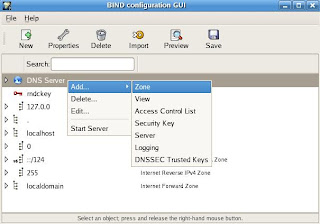
9. Before we begin our second task of creating an alias for our Client1 Windows XP system, we first need to create a new DNS Zone for BigSkyFishingSupply.com. To do this click on the New button and click Zone.


10. The box below will come up. This box is confusing. What you want to do is first click OK under Class, then OK under Origin Type, then OK at the bottom of the window.


11. That will bring you to the box below. On this window, fill in the Forward Zone Origin box with BigSkyFishingSupply.com. Don’t forget the “.” (dot) at the end of the domain name. Click OK.

12. Next, you’ll see this tall window that is used to configure the Zone. Make sure that the Authoritative Name Server is Server1.BigSkyFishingSupply.com. Nothing else needs to be changed.


13. Now, we can move on to adding the aliases for the Windows Client and for the DNS Server itself. To do this, right click on the BigSkyFishingSupply domain line and clickAdd. A menu will appear. Click on the first line that says A IPv4 Address.


14. In the A IPv4 Alias window that appears, enter the client’s name as
client1.BigSkyFishingSupply.com. and the IP address for Client1 as 192.168.1.10.


Click OK. Now, repeat this procedure for Server1 by adding an A IPv4 Alias record for Server1 at IP address 192.168.1.100.

15. Let’s now go ahead and save the DNS server configuration changes by clicking the big Save button on the toolbar, like this:


When you are asked if you want to backup and replace the DNS configuration files, click Yes.

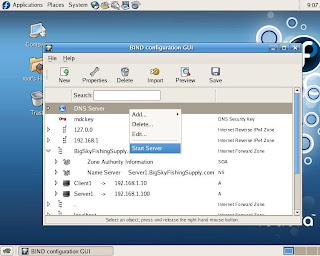
16. Let’s go ahead and start our DNS server. It is not started by default. To do this, rightclick on the DNS Server line, then click Start Server, like this:


17. For our third task of configuring the Linux server to use itself for DNS, go to System - Administration - Network, then click on the DNS Tab. Now close the DNS GUI management utility by clicking the X on the top right hand side of the window. Change your current Primary DNS server to the IP address of your Linux server, 192.168.1.100. Remove the Secondary DNS Server. When done, it should look like this:


18. Go to File and click Save. You will be given a warning that “changes are saved and you
may need to restart network services”. Click OK. Close out the network configuration by going to File and clicking Quit. For this to be the production DNS server, there is an important configuration change we need to make. We need the DNS Server (also known as bind and named) to start automatically, when the server starts. To do this, go to System - Administration - Server Settings - Services. This will bring up the services window. Scroll down to the named section (they are in alphabetical order) and check the checkbox next to it.


Once named has a checkmark, click Save on the Toolbar. Then, close the Services Configuration by clicking X on the top right hand side of the window. Let’s go ahead and restart the Linux machine to ensure all network changes took effect. To do this, go to System - Shutdown. When the window appear, select Restart computer. Once the Linux server restarts, log back into the console as root. We have completed the configuration of the Linux DNS Server.

To test our Windows client with name resolution for local and Internet DNS names, we next need to change our DNS server setting on the Windows client.

19. To do this, on the Windows client, go to Start - Settings - Network Connections and click on your local network connection. This could be a wireless adaptor or a wired Ethernet adaptor. Once the status window for your connection appears, click on Properties.


20. Once the properties appear, scroll down the list of items used and double click on TCP/IP.


21. At this point, it is important that you use the static IP address, subnet mask and default gateway provided. Most importantly, you need to change the DNS server information to look like it does in the picture. In other words, you only have a primary DNS server and that is your Linux server at IP address 192.168.1.100.


22. Now click on the Advanced button, then on the DNS tab.


23. In the DNS suffix for this connection blank, type in BigSkyFishingSupply.com and click OK. Click OK on the TCP/IP Properties box, then OK on the network connection properties so the changes will take effect. At this point, you should be able to open a web browser and go to your normal Internet web sites because you are using Internet DNS forwarding through the Linux server. Test this out. Also, open a Windows Command Prompt by doing Start - Run and typing cmd. Once in the command prompt type Ping server1 and Ping client1.bigskyfishingsupply.com (you must use a fully-qualified domain name or else the client will just resolve DNS to its local host adaptor, not really testing the new DNS server). If your new Linux DNS server is configured properly and working, you should have all ping requests responded to, like this:


CopyLeft © 2009 http://fedora-x.blogspot.com/


Download PDF Format : installing & configuring DNS Server on Fedora Lab.2
Related Post : installing fedora linux lab1

Tuesday, January 13, 2009

Installing Fedora Linux – Lab.1

1. To install Fedora Linux, insert CD #1 in your CD drive and power on your Server1 (your computer) system. The server should find the CD in the drive and boot from it. You should see a screen that looks like the one below.


2. You can press F2 to see the boot loader options, like this:


3. Normally, you will just press the Enter key to begin the boot, with the default settings, in graphical mode. After pressing enter, you will see a lot of text information scroll by quickly. This is the Red Hat system starting up. You will now see a colorful text menu screen, asking if you want to test the CD media for errors. Note that your mouse doesn’t work here. You need to either use tab or the right arrow to move over to the skip button. Once there, either press the space bar or enter to select.


4. Now, Anaconda, the Fedora Linux Installer, will start up and the screen resolution will change from 640x480 to 800x600. Here is what you will see:


5. Your mouse should now function. Use it to click Next. On the language selection, take the English default by clicking Next (assuming that is your choice). On the keyboard selection, take the default of US English by clicking Next (assuming that is your choice).Assuming you have a blank hard drive, you will be told that the partition table is unreadable and you will be asked if you want to initialize the drive and erase all data.


6. Click Yes. You are now in the Disk Partitioning Setup section. The simplest choice here is to take the defaults. However, if you have some more advanced knowledge, you can review and modify the partition layout using that option.


7. Click Next. On a new installation, like this one, you will get a message that says that the partition table on device sda was unreadable and you must initialize the drive to continue.


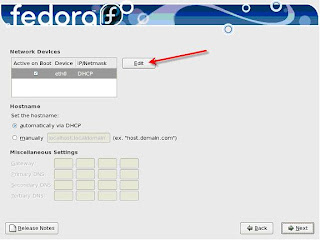
8. This is required so click Yes. Now you are at the networking configuration screen. It is here that you either take the default of configuring the Linux system’s IP address information via DHCP (from a DHCP server on your network) or using static IP address information. In most cases, DHCP works fine, just as you would on a Windows workstation. However, in our case, we have some specific static information we want to configure.


9. Click Edit on the Network Device section. A window will come up. In that window,
uncheck the Configure using DHCP option and fill in the static IP address and subnet
mask, like this:


10. Back on the main network configuration screen, put in a hostname for this Linux system. The hostname should be Server1.BigSkyFishingSupply.com. Enter the gateway from the setup section of 192.168.1.1 (or whatever your local router’s gateway is). Enter the primary and secondary DNS IP addresses that are provided by your Internet Service Provider or this information for already existing DNS servers on your LAN. When you are done, the screen should look similar to this:


11. Click Next to continue. On the next screen, set the time zone to North Dakota / Central because that is where the Big Sky Fishing Supply Company is located.


12. Click Next. On the next screen, type in the root password. The root password is the administrator and “super-user” for this computer. Because root has unlimited power on this Linux system you should choose a secure root password. For the purposes of this lab, type in Fishing123 in both blanks and click Next.


13. You are now at the package group selection screen. As we chose a custom install, you must choose your list of packages to be installed. Click Customize Now. Click Next.


14. On the next screen, use the sections on the left to choose the following additional packages
(in addition to what is already checked) :

• Servers:
o DNS Name Server
o FTP Server
o Network Servers
o Printing Support
o Server Configuration Tools
o Web Server
o Windows File Server
• Base System:
o System Tools

Here is an example of what the Servers section looks like (make sure you scroll down on the right hand side to see all the choices):


Check the proper checkboxes from the list above for both the Servers and Base system
package groups then click Next.

15. The next screen says that you are about to install the operating system. Click Next.


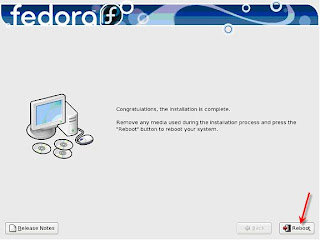
16. The file systems will be formatted and the installation process will begin. Assuming you are installing from CDs, at various points in the installation, you will be asked to insert the remaining installation CDs. This whole copying process can take about 45 minutes, depending on the speed of the machine, CD drive and Disk. Once the copy process is completed, you should see a screen that looks like this:


17. Click Reboot and the system will restart. The boot will go through various phases. Once the boot is successful, you will see this, “Welcome to Fedora” message.


18. Click Forward. Now click Yes, and Forward to accept the license agreement. You are now at the firewall configuration screen. I recommend disabling the firewall for these labs, to prevent any problems. If this machine moves from being a test machine to a production machine, you should test enabling the firewall at that point to protect your production machine. Change the Firewall option from Enabled to Disabled. Click Forward and then click Yes to continue without enabling the firewall.


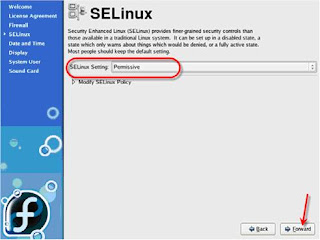
19. You are now asked about SeLinux (Security Enhanced Linux). SeLinux provides additional security over regular Linux Security. Choose the Permissive setting for SeLinux as we don’t want to begin enforcing at this time. Click Forward.


20. In the next screen, you will be asked to either set the date and time or to use a network time protocol (NTP) server. If you don’t have a NTP server on your network already, Red Hat Linux offers some of the standard Internet NTP server domain names. In our case, let’s say that Big Sky Fishing Supply wants this server to use the Internet NTP servers to obtain its date and time information. So click on the Network Time Protocol tab. On this window, check the checkbox to Enable Network Time Protocol. You will be using the default servers. Your window should look like this:


21. Click Forward and the system will attempt to contact the NTP servers on the Internet. On the next screen, you will be asked for the resolution and color depth for the Linux console monitor. The default is fine.


22. Click Forward. You will be prompted to create a regular user login (non-superuser). Create a user called testuser and set the password to bigskyfishing.


23. Click Forward. Click Finish on the soundcard screen that appears.


24. Some flashes of the screen will happen and you will be asked to login to the system. Login as root with the password you configured.


25. You should now see the screen below and be logged on to Fedora Linux


The installation process and Lab 1 are now complete. At this point, I highly recommend opening the web browser on the newly installed server and testing browsing to the Internet. Assuming this is successful, you have proved that you have a network connection and valid network settings.

CopyLeft © 2009 fedora-x

Download PDF Format : Installing Fedora Linux